About this Resource
This guide is not an exhaustive anthology of everything that you need to know about teaching. Rather, it takes you on a holistic tour of how to plan and run a class from start to finish complemented by helpful teaching resources. These resources include best teaching practices, handy charts of essential information, linked resources for further reading, and videos. The first section guides you through the logistics of setting up a new course and offers resources and advice geared specifically toward graduate student teachers at the University of Toronto. The rest offers general best practices concerning syllabus, lesson, and assessment design; content delivery and classroom culture; effective feedback; and further resources for teaching that should be helpful at any post-secondary institution. To reflect the interconnectivity of course design, some concepts and resources are deliberately repeated in this guide.
Thinking About Your Teaching
Student-centred course planning requires thoughtful reflection. Before starting to plan course outcomes or readings, it is a powerful and worthwhile exercise to take a moment to reflect on your teaching values and goals. For example, consider:
- What do you want your classroom to be like for students?
- What kind of teaching values and strategies will help you to cultivate that classroom environment?
Be mindful that teaching is a craft, not an innate state of being. If you want to improve, you will need to reflect on your values as well as past teaching experiences and then leverage those toward your new teaching contexts. This will include a bit of experimenting. A good place to start is to review feedback you have received from previous teaching; then consider what you value as a teacher alongside what others have seen in your teaching.
If all this sounds like a messy process, that’s because it can be! And that is what makes teaching equally as rewarding as it is challenging. But when things get difficult, there are many options for teaching support at the University of Toronto.
Teaching Resources and Supports
As a graduate student Course Instructor, you have access to a wide array of teaching resources and experienced teachers. It may be useful to think about teaching resources in terms of spheres: 1) personal, 2) departmental/divisional, and 3) institutional.
Talk to seasoned faculty members and experienced graduate student course instructors. They are an excellent source of teaching norms in your department and discipline. Ask questions such as:
- What do you wish you knew before you started teaching your own courses?
- What was most challenging or surprising?
- What are some department-specific teaching requirements?
- Are there department pedagogy courses I can take?
Your division or faculty may have a handbook for instructors. If there is a handbook, it will be invaluable to acculturate you to the expectations of policies, pedagogy, and protocol for contingencies. Some individual faculties and departments also offer in-house teaching supports, so be sure to chat to teaching mentors in your field to see what supports are available that are already tailored to your discipline.
The University of Toronto has a few hubs for institution-wide teaching resources, including the TATP.
- The Centre for Teaching Support and Innovation is geared toward faculty development at U of T serves all three campuses
- The Robert Gillespie Academic Skills Centre provides support on UTM
- The Centre for Teaching and Learning provides support on UTSC
Essential Lessons
Five essential lessons to keep in mind.
Your course will probably change a bit with each incarnation and you as an instructor will also change each time you teach it. This kind of change is valuable, but it requires thinking and rethinking, planning and revising, and making an action plan for future improvement. We hope this guide will be useful for your first or tenth course.
Setting these goals early on will help to keep you aligned with what you think is most essential for your course.
Feedback comes from students, peers, mentors, faculty, and from your own reflection on your teaching practice.
Students are your main audience and their learning is the most important goal of the course. In all aspects of course design and implementation, we must be thinking about our students.
This means adopting a way to reflect on and record your teaching practices, ideas and challenges. Along with saving emails and documents related to teaching work, you could keep a journal of teaching notes or record your teaching ideas on your phone.
As we transition into new roles and realms of teaching responsibility, some of us naturally creep into that feeling of being an imposter. We at the TATP acknowledge that imposter syndrome exists and that this feeling is especially pronounced and common among graduate students. But we want to remind you that even though you may sometimes feel like an imposter, you have been explicitly chosen to be a sole course instructor. So, welcome to your new teaching role! You are ready and the TATP is here to help.
Set Up Your Course
There are many administrative responsibilities to consider before your course begins. The very outset of the course is the ideal time 1) to identify your course administrative elements, 2) to build your teaching team, 3) to familiarize yourself with essential institutional policies, and 4) to get acquainted with academic integrity policies.
Before the term begins, there are six key administrative considerations.
Administration and logistics
Important dates and deadlines
- Accustom yourself to important dates and deadlines for your course, the department, and the University.
- At the University of Toronto, each faculty and division has their own schedule of important dates. Links to most of them can be found on the important dates page on the Current Students website.
- Carefully read departmental memos of essential dates (such as term start and end dates, add/drop deadlines, final exam period) or access this information through your institutional website.
- Be aware that some of the elements of the course will be due far in advance. For example, final exam scripts are usually due before the last day of classes.
Course readings and materials
- As soon as possible before the start of the term, select your course readings and course materials.
- You can adopt books and create course packs through the University of Toronto bookstore. Although you can order books for students from outside the university, we recommend that you use the campus bookstore at least for your first class until you have ample time to investigate other options.
- As a course instructor, you can request desk copies of textbooks for yourself and your TAs. Sometimes the campus bookstore can facilitate this process. Desk copies may be in available in hard copy, digital, or both. When time is an issue, it may be worthwhile to have a digital copy as soon as possible.
- Liaison librarians can support your teaching and research; post directly to your course Quercus page; support student learning in your class through library research guides, in-class instruction, and drop-in or office hours; and provide a range of services around course readings and copyright. Contact a liaison librarian as soon as possible.
- You can also put books on course reserve through the Course Reserve and Syllabus Service. Check this page for submission deadlines.
- The University of Toronto expects you to be familiar with their Copyright Fair Dealing Guidelines. You will need to be especially attentive to copyright issues when ordering course packs outside of the University.
Classroom space
- If possible, visit your teaching space to review lighting, acoustics, and available teaching technology.
- You can look at the individual specs of your classroom in advance, including the room capacity, type of seating, and what sort of teaching station is available.
Paperwork
- Keep on top of administrative paperwork. Most paperwork is due at the beginning of the term, for example: course syllabi, marking schemes, and description of duties and allocation of hours (DDAH) forms for teaching assistants. Some will also be due at the end of the term.
- Be sure to document everything related to the course. For example, save all correspondence, including email, for at least one year in case the department asks for these materials later.
Department access
- Find out how to access administrative resources before your class begins.
- Where is your office? Is there a department phone number for students to reach you? Where is the printer and/or copier? Do you need a code to use it? Do you need keys after hours? Where is the department drop box?
Quercus
- Set up your Quercus course shell and ideally make it available to students before the class begins.
- If you need guidance, visit the Quercus Quick Guide or consult Quercus Support for contacts within your academic unit.
- Visit CTSI’s Educational Technology to learn more about Quercus support resources and U of T’s Academic Toolbox, including tool guides, a tool finder and teaching with technology resources.
Building a Teaching Team
Working toward shared teaching goals and objectives requires thoughtful communication. Once you get your Course Instructor contract, you should inquire whether or not you will have TAs and contact them as soon as possible. Knowing how much, if any, TA resources you have for the course may influence how you set up the course, so the earlier you know about your TAs the better.
TA distribution happens differently in each department. They may automatically be assigned to certain courses or you may need to request them. If TAs are assigned to your course, you may or may not have say over which TAs are chosen. Ask the department chair or TA coordinator about policies related to getting TA support, TA assignments, and TA policies for your course.
As a graduate student Course Instructor, it can sometimes be tricky to navigate your work with teaching assistants because it is likely that they will also be your departmental peers. The TATP’s Course Instructor-Teaching Assistant Relationship provides support developing and managing an effective teaching team.
Policies
The University has developed a variety of policies intended to protect both you and your students. This page highlights some of the key policies that relate to the work of TAs. These come under four broad areas of responsibility for TAs:
- How to respect confidentiality
- How to avoid conflict of interest
- How to safeguard equity and safety
- How to uphold academic integrity
Respecting confidentiality
What are my responsibilities as a TA with regard to students’ personal information? How can I ensure a reasonable expectation of privacy while still collecting the information I need to do my job?
The University of Toronto is covered by Ontario’s Freedom of Information and Privacy Protection Act (FIPPA). FIPPA carries implications for many aspects of TAs’ interactions with students, including taking attendance, handling assignments, posting grades, organizing group work, and sending emails. Students’ names, ID numbers, email addresses, and grades are all considered personal information that should be kept confidential as much as possible.
Taking attendance: Students’ attendance or non-attendance is their own business. Don’t pass around a sign-up sheet asking students to fill out their full names and student numbers.
Do ask them to sign in with the last four digits of the ID numbers.
- Don’t write grades on the front page of an assignment, where they are easily visible. Instead, write them on the inside cover. Don’t leave assignments in a pile at the front of the room or in the hall outside your office for students to retrieve.
- Do return them to students individually.
- Do use Quercus to enter grades.
- Don’t reveal a student’s grade to anyone else without the student’s written consent.
- Where possible, use Quercus to assign groups, and encourage students to communicate with each other through Quercus.
- Don’t “reply all”
- Use BCC instead. Alternatively, email students through Quercus.
- Protect your email and Quercus passwords.
The University has a Policy on Official Correspondence with Students, which stipulates that students are expected to check their University of Toronto email address on a regular basis. It is good practice to reinforce this expectation by asking students to use their University of Toronto account when emailing you. Likewise, you should always use your University of Toronto email account when communicating with students.
If you are a TA for a small tutorial, where students are expected to know one another or collaborate on group projects, some of these best practices might not be necessary or practicable. Use your best judgement and err on the side of protecting privacy.
Avoiding conflict of interest
I’ve hit it off with one of my students. There are still two months to go in the term. Is it OK to start a relationship?
When I was given the student lists for my tutorial sections, I realized my cousin is in one of my sections. Is this a conflict of interest?
Safeguarding the learning environment: equity and diversity
One of my students keeps emailing me with unwanted advances. How can I make this stop?
In its Statement of Institutional Purpose, the University affirms its commitment “to fostering an academic community in which the learning and scholarship of every member may flourish, with vigilant protection for individual human rights, and a resolute commitment to the principle of equal opportunity, equity and justice.”
The University of Toronto is bound by the Ontario Human Rights Code, which specifies that “Every person has a right to equal treatment with respect to services, goods and facilities, without discrimination because of race, ancestry, place of origin, colour, ethnic origin, citizenship, creed, sex, sexual orientation, age, marital status, family status or disability.” The University has also put in place several policies to protect its institutional purpose. These include:
- the Code of Student Conduct, which spells out the terms and sanctions for student behaviour that disrupts the learning environment;
- the Policy on Sexual Harassment;
- the Statement on Prohibited Discrimination and Discriminatory Harassment; and
- guidelines on appropriate use of information and communication technology, which addresses, among other issues, breaches of student conduct and harassment perpetrated using University of Toronto email or web space.
While you should be aware that these policies exist, also know that they’re not practical guidelines for crisis situations. Should you or one of your students feel threatened, discriminated against, or harassed, here are some places you can turn.
- In case of emergency, call Campus Police at (416) 978-2222.
- In your capacity as a TA, you can also contact Student Crisis Response at (416) 946-7111 for advice in urgent situations, such as when one of your students threatens harm to self or others.
- In non-emergencies, your first step is normally to report the situation to the Course Instructor.
There are several equity offices on campus that can provide additional support and guidance to you and your students.
The main thing to keep in mind is that your responsibility as a TA is to report problems and to refer students to appropriate resources, not to resolve these problems on your own.
Equity and diversity
- Accessibility Services (416-978-8060): Provides services and accommodations for students with disabilities.
- Centre for International Experience (416-978-2564): Offers counselling, information, and education on issues or concerns related to culture and ethnicity.
- Campus Chaplains’ Association at the Multi-Faith Centre (416-946-3120): Offers multi-faith counselling to the University of Toronto community.
- First Nations House (416-978-8227): Offers culturally supportive student services and programs to Aboriginal students and the general university community.
- Sexual & Gender Diversity Office (416-946-5624): Offers counselling, information, and education on issues of concern to the lesbian, gay, bisexual, transgender, transsexual, intersex, questioning, two-spirited and allies community at U of T.
Upholding academic integrity
I think a student might have plagiarized his/her assignment. What do I do?
Matters of academic integrity are covered by the Code of Behaviour on Academic Matters. As a TA, you are bound by the Code and by your employment with the University to report all offenses to academic integrity to the Course Instructor.
You should also consult the University of Toronto’s Academic Integrity site.
- Academic Success Centre (416-978-2011): Extensive help on how to be successful academically through drop-in consultations, workshops and publications.
- English Language Support – English Language Program at the School of Continuing Studies (416-978-2400): Courses to improve English language skills as well as consultations on selection of suitable courses in the program.
- English Communication Program at the Centre for International Experience: Programming geared at improving English communication skills (for international students).
- English Language and Writing Support (ELWS) at the School of Graduate Studies: Provides graduate students with advanced training in academic writing and speaking.
- Math Aid Centres: Assist first year students one-on-one at drop-in centres. Services are free of charge to registered Arts & Science students.
- Writing Centre: Help with academic writing through workshops, consultations and group or individual instruction.
Syllabus and Lesson Design
Integrated course design
Designing a new course can be a bit like putting together a piece of furniture. You have all the parts and there are instructions, but somehow you miss something and end up with a wobbly table. If you had it to do over again, you would easily get it right. The difficulties of setting up a new course are very common and educational developers have written advice on how to make this process easier and aligned with your own teaching goals. Drawing on course design literature, we will outline three parts of integrated course planning: 1) situational factors, 2) key components of course design, and 3) course alignment.
To plan a thoughtful, student-centred course, it is helpful to start by examining the situational factors; this offers you a chance to think deeply about your course from both a teacher’s and a student’s perspective. D. Fink’s “A Self-Directed Guide to Designing Courses for Significant Learning,” page 7 has helpful worksheet to get you started. These factors help you better gauge how to plan your course and what to expect from your students. The first set of factors (“specific context of the teaching and learning situation”) will be most important to your course planning, but it is still useful to engage with them all.
Key components of course design
This area of course planning helps you to align your expectations of learning outcomes with your modes of assessment and the way that you teach.
The key components of course planning are learning outcomes, modes of feedback and assessment, and teaching and learning activities. These three components relate to one another in a cyclical way, rather than in a linear or hierarchical structure. Crafting learning outcomes allows you to clearly articulate what you want students to get out of the course. They will also be helpful for figuring out how you will assess students and can also guide your choice of teaching and learning activities.
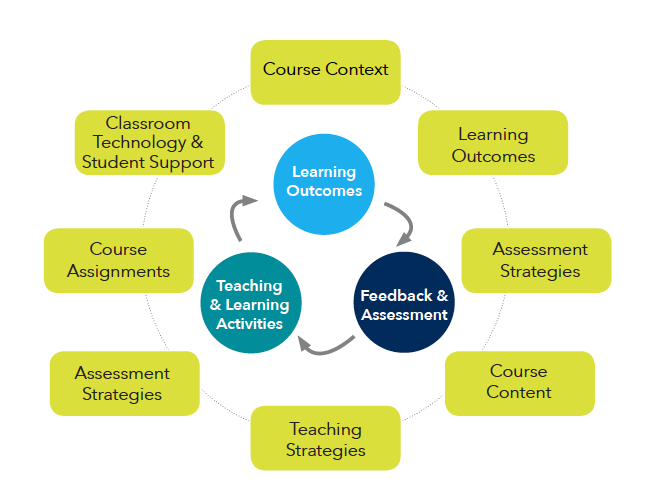
If we think about these two visualizations, the fundamentals of course planning and the course alignment wheel, they help us to understand the subsequent sections of this guide. In this section we will address the planning aspects (course context and learning outcomes), in section 4 we will address assessment, section 5 will address content, section 6 will discuss effective feedback, and section 7 will treat student support.
If all of this sounds a little overwhelming – not to worry! The first course is always the hardest to organize, but with time, practice, and a little bit of patience, you will be planning your courses much more easily and quickly.
We have just gone through the main stages of meta course planning. For your reference, it may be useful to have on hand one of the foundational works in the field of education pertaining to integrated course design: D. Fink’s “A Self-Directed Guide to Designing Courses for Significant Learning.” If you want more resources, CTSI also has information on Course Design with multiple resources for designing or re-designing a course.
Creating learning outcomes
One of the fundamental steps in the initial course design phase is creating learning outcomes for the course.
What is a learning outcome?
The CTSI Guide on Developing Learning Outcomes defines learning outcomes as “statements that describe the knowledge or skills students should acquire by the end of a particular assignment, class, course, or program, and help students understand why that knowledge and those skills will be useful to them. They focus on the context and potential applications of knowledge and skills, help students connect learning in various contexts, and help guide assessment and evaluation.”
Why write learning outcomes?
Since the primary focus of a learning outcome is the learner, a significant overall benefit of creating learning outcomes is that they can help you to shift your framework from being teaching-centred to being student-centred. Learning outcomes are of benefit to both students and their teachers. Learning outcomes help students understand how they will apply knowledge and skills from a course to their own lives and how they will be assessed in the class. If students have an understanding of where the course is going, it will be easier for them to get there. For teachers, developing learning outcomes provides an opportunity to reflect on course content and how we intend students to use and apply knowledge and content gained. Learning outcomes can also be used to decide on appropriate assessments and to provide standards for evaluating those assessments.
How do you write learning outcomes?
As with all course planning, developing course outcomes also requires you to ask yourself a few questions, such as:
- What essential things must students know to be able to succeed in the course?
- What essential things must students be able to do to succeed in the course?
- What knowledge or skills will the course build on? What knowledge or skills will be new to students in the course?
- What other areas of knowledge are connected to the work of the course?
Once you answer these initial questions, you can start to craft your learning outcomes. Often, these statements begin with “By the end of this course, students will be able to….” The CTSI guide on Developing Learning Outcomes contextualizes learning outcomes, provides examples of strong and weak learning outcomes, and shares further resources to create strong learning outcomes. Here are three examples of learning outcomes from the guide linked to content, skills, and values.
- Content-Centred Outcome: “By the end of this course, students will be able to categorize macroeconomic policies according to the economic theories from which they emerge.”
- Skill-Centred Outcome: “By the end of this course, students will be able to analyze qualitative and quantitative data, and explain how evidence gathered supports or refutes an initial hypothesis.”
- Value-Centred Outcome: “By the end of this course, students will be able to work cooperatively in a small group environment.”
Strong learning outcomes are linked to various levels of learning. Bloom’s taxonomy of significant learning ranks these learning levels from lowest to highest level of intellectual engagement. As shown in the graphic below, Bloom’s stages of learning, from lowest to highest, are remembering (including memorization), understanding (explaining ideas or concepts, restating in your own words, paraphrasing, summarizing), application (using information to solve problems, translating abstract ideas into concrete solutions or identifying connections), analysis (identifying components and logical structure), synthesis (combining knowledge from multiple fields), evaluation (making decisions and determining value), and creation (building something new out of information and knowledge).
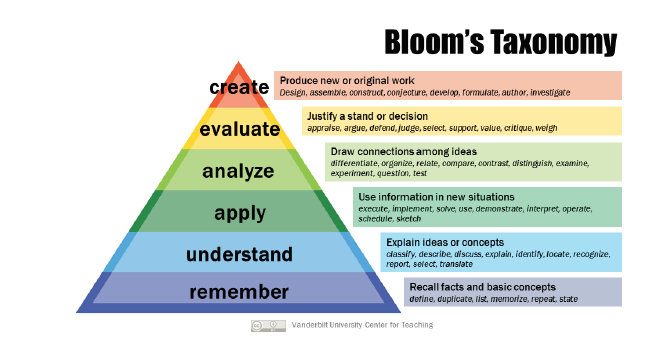
When writing your course outcomes, you will need to consider if you are expecting students to learn on a knowledge-gaining level, to be able to evaluate an aspect of their learning, or to achieve a combination of levels of Bloom’s taxonomy of significant learning. The important part is that you identify these various level for your students.
Therefore, part of the strength of good learning outcomes lays in the verbs chosen to articulate those outcomes (see Action Verbs for Bloom’s Revised Taxonomy. This resource would be useful to have on hand whenever you write learning outcomes. You could also watch the CTSI module on Developing Course and Tutorial Learning Outcomes.
While creating learning outcomes, be mindful of your class enrolment. Whether you have 100 students or 10 will impact what students can achieve.
How can you use course outcomes to organize the rest of your course?
Once you have created the course learning outcomes, they can be used across the course planning process. For example, each lesson or lecture should have learning outcomes that are rooted in the overall course outcomes. Directly linking these two aspects, overarching course goals and individual lesson goals, will help students to see the connections between the big picture and the smaller details that may otherwise not be readily apparent.
Your learning outcomes will be connected to your teaching and learning activities and your assessments. You can also use course learning outcomes to inform weekly lesson planning and to support the creation of tutorial outcomes.
Syllabus Design
Whether you are crafting a syllabus from scratch or revising an inherited syllabus, writing your course syllabus can be one of the most time consuming parts of preparing your course. Luckily, there are some aspects of creating a syllabus that are quite similar across disciplines. Below we offer five parts of creating a syllabus that are pertinent no matter what your academic field: 1) essential elements, 2) keeping students central, 3) organizing and setting course content, 4) policy statements, and 5) syllabus review.
Essential syllabus components may vary across institutions (check with your hiring department for the official syllabus requirements), but the following elements are the most typical requirements for a course syllabus.
- Course Details: course title, course description, course and tutorial outcomes, skills students will gain from the course
- Contact Details: your contact information and office hours, TA contact information and office hours
- Policies: course policies, department policies, institutional policies
- Course Work: required course readings, marking scheme, assessment due dates, weekly schedule
It is also important to consider how your students will use the course syllabus and what kinds of questions they expect to be answerable by reading the syllabus. For example:
- What are the course outcomes?
- How is student success defined in the course?
- How does the course fit into the broader learning context?
- What does the professor expect from the students?
- How will classes run? How will participation be assessed?
- What learning resources are useful for the course?
Developing content for the syllabus can be one of the most engaging components of crafting a syllabus because it requires exploring the field. Before beginning to write your own syllabus, research what others have done with the same or similar course. Look at what others in your department have done in the past or look online for similar courses at other institutions. Previewing other syllabi can help save time in the overall process and help you avoid creating an overly comprehensive syllabus or one that is too thin. You will also need to decide how to organize the material. Do you want it to be chronological? Thematic? Broad to specific? Problem-based? Methodological? Rooted in a core textbook or a collection of essential readings of the field? Consult your course outcomes in this process and ask yourself: Which course organizational structure will most help my students achieve the course outcomes?
Choosing readings will likewise require some questioning. What is a realistic amount and level of readings for first-year students? For third-year students? Choosing readings can be fun, but can also be overwhelming. The challenges for starting a new reading list will be greater than revising one, so be sure to allot an appropriate amount of planning time for this. When creating a new reading list, you will at least need to skim all readings before making a final decision. When revising a reading list, choose just one or two sections to revise instead of revising your whole reading list. Remember that teaching is an iterative process, not something that you have to reinvent with each version of a course.
Most universities have sample policy statements prepared for their instructors. The University of Toronto, for example, has sample statements about academic integrity, the University’s plagiarism detection tool, accommodation, and library resources. These sample statements can be found in the Course Instructor handbook of your faculty or in the CTSI tip sheet on Developing a Course Syllabus. While most of these statements are optional, consider using them to provide additional resources for your students.
Lesson planning for instruction
Once you have a solid syllabus in place, you can begin planning individual classes. We recommend that you revisit your course learning outcomes and keep those in mind while you shape the plan for each class meeting. There are six essential elements of lesson design.
This phase of the learning captures students’ attention and calls to mind what they already know about a topic before adding new information. Activating prior knowledge is great for students because it shows them what they already know, which contributes to their interest in future learning and clarifies the foundations of their learning.
In this phase the teacher provides the goals and expectations for the lesson by showing students the big picture. This is where you can connect the learning outcomes for this specific lesson with the course outcomes overall.
This phase can take several forms, such as lecture, demonstration, role play, or discussion; students may also engage in active learning techniques alone, in pairs, or small groups.
After instruction, the teacher should check for understanding of the main points of the lesson through an informal assessment. This could be a quiz, question & answer, or brief discussion.
In this phase students implement their learning. For example, students might analyze a primary text, role play, or solve a problem set.
Provide clear closure to a lesson by returning to the lesson’s goals, addressing any points of the lesson that may still be confusing, foreshadowing the next lesson, or showing how the lesson extends to a broader context.
These phases of lesson design are meant to be used flexibly. You may choose to leave out some steps or alter their order, but we suggest that you at least keep the first and last steps to clearly frame the lesson. The TATP have also created a useful lecture plan template to plan your individual lectures. This template helps keep you focused for each lecture and maintains consistency of your lessons across the term.
Lesson planning for tutorials
It is equally important that the tutorials have consistent lesson plans, and that the tutorials complement the work covered in lecture. If you have TAs leading tutorials, it is a good idea to discuss with them the format of your course, and explain how you would like the tutorials to participate in the course’s learning outcomes. For designing tutorials and a tutorial planner, visit Tutorial Design. Early communication of expectations encourages tutorial consistency, so you would ideally introduce these templates to your teaching assistants in the pre-course meeting.
Planning active learning
One of the best ways to engage and motivate your students during a lesson is to use active learning activities. Active learning should be signalled to the learner in the syllabus and in individual lessons.
Some students may be resistant to active learning, so it is important that we are transparent about why active learning is important. The information below provides the average retention rates divided by the type of instruction; it clearly shows that the more actively a student engages with course content, the more likely they will retain the lesson.
Average retention rates for different teaching methods
- Doing (teaching others/immediate use of learning): 31%
- Doing (practice by doing): 27%
- Verbal and visual process (discussion group): 18%
- Verbal and visual processing (demonstration): 11%
- Verbal and visual processing (audiovisual): 7%
- Verbal processing (reading): 4%
- Verbal process (lecture): 2%
Source: Barkley, Student Engagement Techniques (2012)
For in-class activities there are a great variety of options to engage students in active learning, which can be done individually, collaboratively, or cooperatively. Whether you are new to active learning or want to freshen up your active learning techniques, the TATP’s Active Learning resource offers background on active learning and eighteen effective active learning activities. Active learning is often easiest to implement in small-class environments; however, students in large classes benefit from active student engagement as well; the guide mentioned above also provides adaptations for each activity to scale them up for implementation in larger classes.
Active learning in the classroom should be low stakes activities. Low stakes assessments carry little or no weight in terms of grades and allow students to practice deepening their understanding of a topic or to develop specific skills. Examples of low stakes assessments are online quizzes or in-class small group activities like a think-pair-share. To support student writing, the TATP have also developed a resource Low Stakes Writing Activities.
When choosing your active learning, you can bridge the relationship between significant learning and active learning by correlating learning activities with Bloom’s taxonomy.
There is a relationship between Bloom’s taxonomy and the styles of teaching: the lowest levels of Bloom’s taxonomy (rote memorization) are connected with the most passive form of learning (lecture). Likewise, the highest level of Bloom’s revised taxonomy (creation) also correlates with the most beneficial active learning technique (teaching others). Thinking about the relationship between modes of teaching, modes of learning, and average retention rates with your class might be a good way of developing ways to incorporate more active learning activities into your class. Furthermore, discussing this relationship with your students can be a good way of decreasing resistance to participation in active learning activities in the classroom, tutorial, or lab.
Assessment Design
Assessments are a critical part of teaching. They provide instructors a way to see if their students understand the material. Assessments vary greatly, so it is important that you think carefully about what assessments will help your students succeed in your particular course. Remember that assessments should be student-centred and in alignment with your course goals.
Varying types and stakes of assessment
Varying Types of Assessment: When choosing the assessments for your course, it is important to consider the variety of assessment options. Because the types of assignments (such as laboratory reports or annotated bibliographies) vary greatly across disciplines, this guide will focus on categories of assessment rather than specific types of assignments. The three main categories of assessment are 1) diagnostic, 2) formative, and 3) summative. Each category has a different aim and tests a different type of learning.
Diagnostic: Used before the learning process
Formative: Used during the learning process
Summative: Used at the end/after the learning process
Diagnostic: Shows where your students are before learning begins
Formative: Provides feedback while the learning is in process
Summative: Evaluates student learning by a standard after the learning
Diagnostic: Aim: Help students access prior knowledge and what they do not know
Formative: Aim: Help students build learning and skills to complete larger assessments and identify gaps before formal assessment
Summative: Aim: Help students see what they have learned and where they still have gaps
Diagnostic: Ungraded
Formative: Ungraded or graded
Summative: Graded
Diagnostic: Examples: Student survey, quiz, one-minute paper, muddy points
Formative: Examples: Summary or abstract, lab report
Summative: Examples: Final exam, final report or essay
Be mindful that assessments do not rigidly fit into only one category and sometimes one form of assessment can be used to test more than one category. Use your course learning outcomes to help you determine what type of assessment is most appropriate.
Varying Stakes of Assessment: Equally as important as choosing your assessments is deciding on the level of stakes of each assessment. Low stakes assessments, which have already been discussed in section 3.4, will be most useful for diagnostic and formative assessments because they can be ungraded. High stakes assessments will be assigned a grade; since they are worth more they carry larger consequences for students. Some examples of high stakes assessments are research papers or final exams. These high stakes assessments typically rely on a deeper understanding of the material and a more complex skill set than low stakes ones. It is best practice to start with low stakes assessments that scaffold skills and knowledge for student as they build towards high stakes assessments. Then, when the higher stakes assessments come due, students are better prepared to succeed.
Scaffolding and student supports
When planning course assessments, we recommend that you scaffold your assignments and tests. Scaffolding is structuring assignments and course material in a systematic way to support your learning objectives and make the goals and process transparent to students. Ideally, scaffolding should stem from your learning objectives. When scaffolding, you can break learning outcomes into manageable steps using low stakes.
Term paper (high stakes):
- Choose a topic (no stakes)
- Annotated bibliography (low stakes)
- Thesis statement exercise (low stakes)
- Outline/draft (moderate stakes)
Final exam (high stakes):
- Online quizzes (no stakes)
- In-class quizzes (low stakes)
- Mid-term exam (moderate stakes)
Scaffolding offers you a chance as a teacher to check students’ understanding of the assessment and provide feedback while they can still make improvements. When scaffolding assessments, you will also want to keep in mind the size of your class and whether or not you have a TA to mark them. The more complicated your scaffolded process is, the more marking there will be. Although ideally we would like to make as many assessments as necessary for our students to learn the skills they need, realistically, we also need to account for the time it takes for students to complete assessments and for us to provide meaningful feedback on them.
Each level of the scaffolded assessment should also provide relevant student supports. Ask yourself: What additional supports will students need to complete the assessment well? For example, if you assign a research paper, contact your faculty liaison librarian. They can create a library guide for research and can come to your class to talk about how to use the library guide as well as library resources.
Assignments
Setting up course assignments happens in three phases: 1) planning, 2) implementation, and 3) evaluation.
Planning
When choosing assignments for your course, it may be useful to ask: What sorts of assignments will best help your students achieve those outcomes? The chart below includes examples of assessments that overlap with different levels of Bloom’s taxonomy.
Level of Understanding in Bloom’s Taxonomy: Understanding
Example Assessment: Quiz, definition exercise, description/summary or labelling
Level of Understanding in Bloom’s Taxonomy: Application & Analysis
Example Assessment: Case study, letter to the editor or memo, problem sets, completing lab work, work placements
Level of Understanding in Bloom’s Taxonomy: Synthesis & Evaluation
Example Assessment: Literature review, research project, lab report, business plan
Remember that assignments should support the course learning outcomes.
Implementation
Designing assignment instructions can be one of the trickiest parts of the assignment creation process. You want to be sure that the assignment is sufficiently academically rigorous, but also comprehensible so that your students will know what to do. Thus, writing prompts for assignments also requires carefully planning. Again, you will want to ask yourself: What do you really want from your students? Below are some guidelines to help you to create assignment instructions that are unambiguous, concise, and complete while also telling students what you want from them.
- Identify an audience
- Use consistent language
- Be aware that other disciplines may have different expectations of similar assignments. Clarify what you are looking for
- Choose specific over general instructions
- Keep the most important information prominent in assignment handouts
- Help students see the connections between the assignment and other course material
- Direct students to resources that will help them complete the assignment
Evaluation of assessments
Aim to be as consistent as possible when evaluating students’ work. This might mean that you distribute a marking key to your TAs or consider using rubrics or holding a benchmarking session.
A rubric is about the process of grading. It is an outline that provides a set of expectations for the assignment. Rubrics take a wide variety of forms. The two most common types are holistic and analytical rubrics. To create a holistic rubric, decide which aspects of the assignment are most important and use these aspects to guide your feedback. Holistic rubrics allow for more impressionistic responses to assignments, and encourage substantive comments, including guidance for future work. Analytical rubrics are used to assess particular components of an assignment according to specific criteria. To create an analytica rubric, determine the criteria that are most relevant to the learning outcomes of the assignment and decide which descriptors best characterize different levels of success in meeting these criteria. Analytic rubrics allow for quick assessment of a range of criteria without the need for detailed comments.
Rubrics should tie feedback to your learning outcomes and clearly articulate expectations not only of what the assignment should include and look like but also how you will evaluate them. They can also ease the grading process and keep grading consistent across teaching assistants. No rubric will be perfect. One challenge of using a rubric is that they can sometimes feel too analytical and seem to lock you into a certain grade that might be quite different if you had graded from a holistic perspective. When creating a rubric you will also need to consider: Do all areas of the rubric carry equal weight? What do you do when an assignment falls in between rubric categories? Make rubrics with enough flexibility that you can balance giving accurate feedback and also assign a grade that makes sense in the context. Always be sure that the rubric includes all the required sections of the assignment.
A benchmaking session is a meeting where all TAs or graders are gathered by the instructor to discuss approaches to grading and to clarify, amongst the group, the expectations for marking the assignment. This will usually involve everyone reading the same assignment and then discussing what grade they would assign and why. If you have TA hours available, benchmarking can be invaluable to maintain consistent grading.
One final consideration for assessment is whether or not you expect your students to work in groups or individually. For some students and disciplines, collaborative projects will be the norm and for others it will be a new experience. When grades are tied to each others’ participation in the assignment, be very specific and clear about how you intend them to complete this project together. Even more than for individual assignments it would be useful for students to have a clear set of guidelines for how to complete their individual part and how to create community within the group. You might also consider having the students create their own guidelines for working together and participating equitably as a group.
The reason why it is so important to be transparent with students about group work is because it can potentially be an academic integrity issue. As we saw in section 2.4 above, two forms of academic integrity are cheating (using unauthorized aids), which could be another student, or obtaining assistance from another student. Therefore, it is imperative that you are very clear about what work students ought to complete independently and what they ought to complete collaboratively when working together on projects or presentations.
Exams
The planning phase for exams is similar to assignments in that a strong exam will consider the learning outcomes of the course. In writing quizzes, tests, and exams, however, you can connect a specific outcome with certain types of questions. Types of questions or formats include multiple-choice, case studies, essays (with the prompts given in advance or only during the exam), or take home tests. The University of Toronto has a repository of old exams. Because academic integrity is important, you will need to use the secure login to access the old exams repository. Especially if you are writing an exam for the first time, it would be prudent to check out the variety of examination types and formats that have been given in your department.
Assessing assessments
You may also want to evaluate your own assessments for future improvements. After you create your assignments or exams, it is a good practice to have a peer review it. Consider, when seeking feedback, including guiding questions to your reviewer. Possible questions to pose:
- Does this assessment connect with course learning outcomes? Which ones?
- Are my assignments effectively scaffolded?
- Is the assessment suitable for the level of the course?
- Do students have adequate preparation and resources to complete the assessment?
- Is the rubric or evaluation process clear to students, Teaching Assistants, and co-instructors?
You may also want to get some feedback from the students once they have completed the assessment. Some questions you might ask are:
- What was the most difficult part of this assessment?
- What was the most enjoyable part of this assessment?
- Do you have any criticisms of the assessment? Please provide concrete examples.
- Is there anything that you think should absolutely stay the same about this assessment?
This feedback will be a helpful addition to your teaching notes so that you have feedback available for the next time you use this assessment.
Classroom Culture and Content Delivery
Establishing a shared classroom culture
Once you get into the classroom, building community and cohesion among the members of the class will help you to create a positive classroom culture. But how are you and your students, essentially a group of strangers, supposed to become a community? While it might seem daunting, a few easy steps can make it feel intimate even on the first day.
From the very first class, use introductions and icebreakers as a way to build the community in the classroom. This TATP resource Community Building: Getting to Know your Class provides eleven simple community-building activities. For your part, learning students’ names can decrease anonymity and make students accountable to the group. This resource also offers some suggestions for ways to learn students’ names over time or at least be able to call on students by name with the help of name cards. And encourage your students to learn each others’ names too. In classes of fifty or more students, you can create classroom community by having students regularly participate in small-group activities. This fosters peer-to-peer learning. For classes of all sizes, suggest that students study together or share contact information so that they can reach each other outside of class.
Once you have established some community in the classroom, you can also invite students to help shape how that community will run. For example, collaborate with students to create guidelines for respectful classroom etiquette. This can either be done as a discussion, for classes with less than fifty students, or facilitated through a questionnaire (on paper or online), for classes with more than fifty students. Making students part of this process will likely increase their sense of responsibility toward their classmates. Include yourself in the classroom community by also telling students what they can expect from you.
Discussion of this nature requires planning, but when done well, it can stimulate conversations that benefit both the smallest and largest class sizes. Facilitating conversations in which students add to each other’s comments and you add to theirs is more beneficial than competing for one right answer. In a class of fifty or less, this is fairly easy to facilitate in the classroom. For classes of fifty students or more, this might be easier to facilitate online. By prioritizing ideas over the need to be right, you can encourage collaboration rather than competition among students. For example, have students read different parts of the readings or perform different parts of a problem. Then they will need to collaborate to put all the ideas or solutions together. You can stimulate diverse discussion by occasionally asking open-ended questions that do not have one right answer so that students can all contribute something without making anyone else necessarily wrong. Students ought to have the chance to support each other as well as challenge each other. Providing space for students to respectfully disagree with their classmates and with you will develop their critical thinking capacity. When possible, engage students in shaping the course of discussion. For example, have students develop discussion questions and share them in advance on Quercus.
You can do this by being inclusive in your own behaviour and interactions. And make sure that all rules for the students also apply to you. When responding to students answers, try substituting answers like, “yes, but…” for responses like “yes, and….” One word swap can make all the difference to a student who was nervous about speaking up in the first place, and can do a lot to foster feelings of inclusion for all students in the class. Take every opportunity you have to share your community-building values in class, on the syllabus, and on Quercus.
Cultural expectations
You may also encounter a diverse range of cultural expectations from your students, ranging from the expectations that certain cultural groups have of you as a teacher and their understanding of their own responsibilities to the understanding of academic standards and offenses. For example, there are significant cultural differences in what kind of classroom behaviour is respectful. Some students might have been taught that it is disrespectful to speak out in class, to ask questions of the teacher, or to disagree with an authority figure; other students might have been raised in a culture where quite the opposite is true, and who believe that actively engaging in debate is a form of respectful classroom participation. It is important to remember that these differences in cultural understanding of normal or respectful classroom behaviour will not necessarily map clearly onto categories of language proficiency.
A few best practices will keep expectations clear for students.
- Emphasize the policies that are important to your students’ academic well-being. For example, anticipate that definitions of academic integrity adopted at the University of Toronto are not the same as those elsewhere and that some students may have a very different sense of what constitutes an offence.
- Emphasize your expectations and the rationale for the policies. For example, discuss with your class what citation practice is for, rather than just talking about the consequences of being caught plagiarizing.
Universal Instructional Design (UID)
Part of getting to know your students is also being attune to the differences in student learning needs and expectations. One way that we can reach our students where they are is to use the principles of universal instructional design (UID) when developing courses. UID aims to maximize the usability of all aspects of the course, as much as is possible, and to enhance inclusion of everyone thereby minimizing the need for accommodations. Fostering Safe, Equitable, and Accessible Learning Environments lists the seven principles of universal instructional design. UID should be 1) accessible and fair, 2) flexible, 3) straightforward and consistent, 4) effective and clear, 5) supportive of the learning environment, 6) minimize unnecessary effort, and 7) provide appropriate and adequate space. Fostering Accessible Learning also includes some guidelines for how to put UID into practice including considerations for before the course begins, during the course, and preparing the classroom; common scenarios and frequently asked questions about accessibility and accommodations; and further resources. We do recognize, however, that accommodations will still be necessary for some students.
UID is especially helpful once we realize that students learn best when presented with varied strategies that will include multiple students in various ways. This means creating a learning environment in which there are 1) multiple means of representation, 2) multiple means of action and expression, and 3) multiple means of engagement. The Universal Design for Learning Guidelines provides a description, examples, and benefits for each of these three parts of UID. You might find UID a bit unfamiliar at first, but once you get into the habit of teaching for diverse engagement it will become much more intuitive. Two more resources that will help you to develop your UID instruction are available online: 1) Equal Access: Universal Design of Instruction and 2) Universal Design of Instruction (UDI): Definition, Principles, Guidelines, and Examples.
Creating an accessible learning environment
Since UID cannot remove all learning barriers, we also need to be ready to accommodate students with accessibility-related learning needs. To address barriers to accessibility and to accommodate students with disabilities, the University of Toronto has a dedicated office on each campus (Accessibility Services (St. George); AccessAbility Services (UTSC); AccessAbility Services (UTM). If students need an accommodation at the University of Toronto, they are encouraged to register with the accessibility office on their campus. Below are the broad strokes of the registration and accommodation procedures at the University of Toronto summarized from that guide.
- A student registers with accessibility services. Registering with accessibility services is a multi-step process that can be time consuming.
- The student is assigned a disability counsellor who determines the most suitable academic accommodations.
- Instructors are notified of required accommodations by an accommodation letter from the Accessibility Office.
- The instructor does their best to provide the requested accommodations and contacts Accessibility Services directly, not the student, with any questions.
Requests for accommodations are relayed to instructors by an accommodation letter and can arrive in a variety of ways: in person, through campus mail, via email, or by way of a registrar. The accommodation letter will outline the accommodations that specific student need. Common accommodations include: extensions on course work, writing tests or exams outside the classroom setting, and computerized or peer note-taking services. Not all students with disabilities use Accessibility Services. Therefore, we recommend applying the principles of UID in every course to reach as many students as possible because UID benefits all learners.
While students are not obliged to disclose their disability with their instructors to arrange accommodations, they may chose to. If a student does broach the subject with you, use the opportunity to chat with the student about how you can contribute to their success while making them feel welcome in the class. Sometimes these can be difficult conversations, both for you and the student. In these cases, when a student is disclosing personal issues, prioritize respect and kindness.
Lecturing
In creating classroom culture, you will also need to think about content delivery. By far, the most common way to convey information in the university classroom is through lectures. It might be helpful to think about the lecture as a learning experience that connects the audience, content, and lecturer. The TATP have a lecture plan template that can help you organize your lectures from choosing a topic to making an outline with activities and timing.
Lecturing Effectively from the University of Waterloo outlines seven areas for creating effective lectures.
This includes practicing your lecture (at least for the first few) to gauge timing and comfort with the material. If you can, visit the classroom before the first class to see where you want to stand and what the physical environment is like.
When creating your lecture notes, avoid writing a full script so that you talk to the class, project your voice to the audience, and make eye contact with students. Build flexibility into the notes when you can and even include delivery cues in the margins.
Start off with the big picture and how the topic fits into that context. Be mindful that you can only cover a few main points per lecture. The basic structure should be to preview the learning, deliver the lecture, and then recap at the end. Keeping the lecture outline visible all through the delivery and clearly signposting transitions will also help students to follow along.
Keeping students engaged during lectures will help students retain the content. But you will not be able to keep students’ rapt attention all of the time. The average adult attention span ranges from ten to twenty minutes, so organize your lecture into ten to fifteen minute chunks broken up with learning activities. Engaging students in their learning through individual or group work can keep them active and also allow a chance to practice what they just learned. With the Active Learning and Adapting Teaching Techniques from section 3.6 above, you can create engaging lectures that capture your students’ attention. Consider sharing your lecture outlines, notes, or slides with students in advance.
For delivery, try to be engaging. If you are able to, make eye contact with students, move around the room, project your voice to different areas of the classroom, check in with students that they can hear you, make sure your face is visible as much as possible, and use a conversational tone. It will also help to build a rapport with students in the class by arriving early to informally chat with a few of them. This is an ideal time to learn some students’ names which you can then use when addressing them in class. And bring water to avoid dry mouth and to pause for students to process the lecture content.
When using visual aids, make sure that they have a pedagogical purpose. For example, if you show an image, discuss it in class. The TATP has a resource Using Visual Aids in the Classroom that offers best practices for making slideware presentations and classroom visual aids accessible to all students.
For slides, we recommend that you use PowerPoint because it has accessibility features. Council of Ontario Universities has a resource on Using PowerPoint that provides the best practices of accessible PowerPoint presentations and shows how you can ensure that your PowerPoint presentations are accessible. When using videos, choose ones that have closed captioning. But also be mindful that you will need to use videos and images within the copyright rules of the University. Other accessible options included making large-print versions of handouts and ensuring a high colour contrast on visual aids.
Facilitating discussion
While most of your classroom time as a course instructor will likely be spent delivering lectures, there are also occasions when you will need to facilitate discussion.
Start by creating shared norms for participation on the first day and setting the stage and tone of the class, which we have already discussed above in section 5.1. Provide learning goals at the beginning of the discussion session and then let students know that you will check back in with those learning goals and provide summaries periodically.
When writing discussion questions, start by accessing prior knowledge, using familiar vocabulary, and, when possible, asking questions that have more than one potential answer. When delivering questions, give students time to think about their answers before responding. Remember that the way you ask questions also models good questioning to your students. While facilitating discussion, it is imperative to provide positive, reinforcing feedback both through verbal and non-verbal cues. This can decrease insecurities around participation. If student contributions are totally off track, instead of pointing out where a student is wrong, redirect them to the issue at hand and say, for example, “That’s an interesting point. Can you explain how it connects to the topic?” And you can reference the TATP’s Asking Effective Questions while preparing for class discussion.
Navigating irrelevant questions without demoralizing the class and still encouraging students to ask questions can be tricky. Let your students know that questions that seem simple are just as welcome as questions that seem complex. But also let them know that some questions you will need to bounce back to the class. For example, a question that is clearly answered in the syllabus should be answered by students or a question that will be more beneficial to students if they find the answer themselves rather than you providing the answer on the spot can also provide a useful learning experience. For all class sizes, but especially those with more than fifty students, consider setting up an online discussion board of frequently asked questions and invite students to contribute. With an online discussion board, all students can benefit from reading each other’s questions.
Use small group discussion to stimulate the conversation. When students have a chance to chat in smaller groups they may be less anxious to talk in front of the whole class (since they have already practiced with their peers) and thus, be more likely to participate in large-group discussions. It is also important that we explain that active engagement is important for student learning. And let students do the talking; aim to talk only twenty to thirty percent of the time. Finally, remember to close the session. Save at least five minutes at the end of class to check back in with the discussion’s learning goals and check for student understanding.
Engaging students in an online environment
If you are considering integrating educational technology into the classroom to facilitate discussion or for scaling, visit the Academic & Collaborative Technologies EdTech Catalogue to get started. Some Faculties have their own educational technology offices, so check there for support or contact the central office through the CTSI via the Academic Technology Information & Quercus Help or email q.help@utoronto.ca to book a consultation with our educational technology specialists. These Quercus Divisional Contacts list ways to reach educational technology specialists across the University of Toronto’s three campuses.
Discussion boards are one of the most commonly used online components of classes. The class Quercus page is the ideal place to use, set up and manage an online discussion board because there are staff available to help with any problems you may encounter. Below we will discuss a few components of online discussion forums including: 1) benefits, 2) how to effectively use them, and 3) potential challenges.
Online discussion forums have many benefits. For students, they build a sense of belonging and class community, facilitate collaboration, and facilitate peer learning by allowing students to see and respond to each other’s work. Since students can participate in online forums on their own timeline, students have a chance for in-depth reflection while they research and compose their contributions. For teachers, online discussion forums allow opportunities to engage marginalized students and to gain insight into how our students are thinking about course materials. These forums also allow guests to participate in the class by posting and responding to questions.
The first step in effectively using online discussion forums is to intentionally think about your rationale for using them. Remember that the discussion forums ought to be connected to your course learning outcomes. Online classes are growing, but some students may still be unfamiliar with using online class components, so talk to them as much as possible about how and why you want them to use the online discussion board. If the class meets in person, consider taking one class or part of a class to describe how the online components work in the class; and then directly link the online parts to the rest of the course. Finally, be a model of good online forum usage. The way that you initiate and maintain an online discussion will be seen by your students as a good way to engage in this environment.
One potential challenge for teachers is getting to know the technical side of setting up and managing discussion forums. The Academic Technology Information and Quercus Help group provide tips to help you set up and manage the technical requirements of online discussion board through Quercus. You also cannot assume that your students are technically savvy. You will need to tell them how to use the discussion board. And just as you set up ground rules for engaging in class discussions, we also recommend that you set up ground rules for communicating with each other online. When setting up the discussion boards, it is a good practice to disallow anonymous posts. Making students comment with their name keeps them accountable to mutually instituted guidelines. Finally, be ready for passive students and have a plan for non-participators. You may want to have students talk in small groups in class and then post their findings online as a way to bridge between the in-class and online environment and to keep posting regular. Above all, set up expectations for how students should participate in the online forums.
Adapting teaching technique: scaling
So far we have considered best practices for classroom culture and content delivery, but have not yet discussed much how the size of the class affects how you teach. When considering how to adapt our teaching techniques for various class sizes, we call this scaling, a term used in education to describe the process of being aware of particular learning needs in different sizes of classrooms. When we are talking about adapting teaching techniques, we are talking about adapting by scaling up or scaling down. For example, how would you adapt your teaching techniques for a class of 20 students, 50 students, or 200 students? A student-centred approach that implements active or cooperative learning can help with scaling. When scaling, the Active Learning resource will also be helpful as it provides options for adapting each of these activities to larger class sizes. Below are six considerations for scaling and how to think through their implementation in the classroom.
- Space or setting: Are you in a classroom, laboratory, or a lecture hall?
- Activity difficulty level: Should it be simple or complex?
- Timing: Do you have five minutes or forty-five minutes for an activity?
- Organization or degree of collaboration: Do you want students to work independently, in pairs, small groups, or as a whole class?
- Visual aids: Will you use the chalkboard, slideware, instructional videos, or an electronic whiteboard?
- Educational technology: Will you use Quercus, screen capture, or a student response system to electronically engage students?
When thinking about scaling, spend some time first thinking about what teaching successes you have already had and how you might adapt those to a larger class. Every class size has benefits and complications, so be mindful that something that works well in a small class might not work well in a large class and vice versa. If a first attempt does not go as planned, be patient with yourself and be open to trying it again with some revision.
First class
Now that you have your course set up and have your lesson plan ready to go, it is time to get ready for the first class! Taking the leap into the first class can be daunting – but your careful preparation has put you in a good position for success. To give you just a few more tips on preparing for the first class, take a look at the TATP’s Getting Started: The First Class, which offers suggestions for handling first-class nerves, how to explain core course policies to your students, and setting the stage for an engaging learning environment. The CTSI also provides tips on First Class Strategies.
Effective Feedback
Feedback is at the core of teaching. We all need it, many of us want it, but what do we do with it? How do we get it? What purpose does it serve in our teaching? This section will address 1) giving effective and useful feedback to your students, 2) how to solicit feedback from your students along the way to aid in your teaching, and 3) using feedback you receive, both formative and summative, to improve your teaching.
Giving feedback to students
Providing feedback to students tells them how they are doing and provides suggestions for improvement. While you are teaching, you will often have to give feedback in-the-moment. For example, during an in-class discussion, while you facilitate the conversation, every time you interject to talk you are providing feedback to those conversing with you. This can be either by validating students’ contributions that are on the right track or redirecting comments that are off track or inaccurate. No matter the realm of feedback, strive to be kind, fair, and specific. Chastising a student for an off topic question will not help that student ask better questions. Instead thank the student for their contribution and then respond by reframing their comment or question. Allowing safe chances for perceived failures is critical to learning from feedback as well as to building classroom community.
As an instructor you will usually provide feedback on assessed written or oral work. This type of feedback is often associated with marks and grading. When providing feedback, use these three principles to make feedback a teaching and learning experience.
- Aim for quality over quantity: Avoid noting every shortcoming and instead focus on one or two things that, if improved, will effect the most change.
- Feedback should be future-oriented: Give students concrete ways that they can improve in the discipline, not just on a specific assignment.
- Be constructive: Provide feedback that clearly tells students how to improve.
When providing written feedback, here are a few best practices that focus feedback on the teaching and learning process. The principles outlined below refer to writing summative feedback, which is the summary of feedback you write to the student at the end of an assignment.
- Start by addressing the student
- Provide positive feedback, being as specific as you can, to let students know what they should keep doing for future assessments
- Suggest areas for improvement, with at least one concrete strategy to try. Make sure that it is manageable.
- Direct positive comments to the writer (“you did this well”) and areas for improvement to the assessment (“the assignment did not make a compelling argument”)
- End by signing your own name and providing a grade
This last strategy, directing positive feedback to the writer and critical feedback to the assignment can make a significant impact on the morale of the student. The TATP has a resource on “I” Statement Based Feedback that offers some sample sentences of this dichotomy of constructive and reactive feedback.
As we discussed above in section 4.3, rubrics can be a helpful way to give consistent feedback across the teaching team. As a course instructor you may perform little to no grading for a given course. If you have teaching assistants, one of their main jobs may be to mark student assignments. In these cases, take the time to talk about these principles of effective feedback with your teaching assistants. Use benchmarking sessions to discuss good summative comments and how you would like your teaching assistants to provide feedback.
Asking for feedback from students
There are two types of feedback you can receive from students: formative and summative feedback. We will first address gathering formative feedback and then discuss summative course evaluations at the University of Toronto.
Formative feedback is collected during the course and summative feedback is collected at the end. In-the-moment feedback, solicited periodically over the course of the term, can be used to effect change right away. When collecting feedback, be sure to tell your students that you are gathering this data for your own pedagogical development. If you can create buy-in with your students about giving feedback, you can create a class community in which they feel comfortable to share with you and also feel like there is worth in hearing their thoughts. It is equally critical that the feedback be optional, anonymous, and not linked to marks (not even participation!). Remember that how you elicit and use feedback on your teaching is in many ways a model for what you want students to do with your feedback on their work.
One of the simplest ways to get feedback from your students is to ask them questions. A student questionnaire at the beginning of the term is quite powerful when it addresses context, expectations, aspirations, and community. Here are some examples of possible prompts:
- Context: Ask students about their year of study, their major, and what courses they have already taken in this field.
- Expectations: Ask questions about what students hope to learn from the class, what topic or week they are most looking forward to and why, and how they expect to perform in the class.
- Aspirations: Ask students what they hope to gain from the class, what skills they already have, and what skills they think they will need to be successful in the class.
- Community: Ask your students to tell you something neat about themselves to help you remember them and to give you a chance to learn something about your students.
Distributing this questionnaire in the second or third week of term, rather than the first week, will help you to catch the students that are more likely to stay in the class permanently since enrolment is usually unstable in the first few weeks. There is no need to ask questions about all four categories (context, expectations, aspirations, and community), although it is possible. This early-term feedback will help you to get to know your students while also providing an opportunity for your students to reflect on their own learning.
Midway through the term you can ask for feedback about how the class is working. The Stop-Start-Continue exercise is one example of mid-term formative feedback. Ask students to write one thing that they would like you to stop doing, start doing, and continue doing in the class. Once you receive the feedback:
- Read it over and pull out the main themes. What can you change? What can you not change?
- Share the feedback with your students. Start by thanking them for sharing their voice, tell them the themes you distilled from the feedback, and what changes you can and cannot make and why.
- Implement the feedback as much as is feasible. For example, make adjustments to your lecture planning or class structure.
There is no reason why you must change everything to suit students’ requests, but it is a kind practice to let students know why you have or have not opted to make changes based on their suggestions. Often this simple act of asking the students for feedback when it can effect change will make students feel like they are part of the community.
At the University of Toronto, there is a formal process for gathering summative, and some formative, feedback. Briefly, here is an overview of how course evaluations work at the University of Toronto. The course evaluation framework and online system is currently being used in most divisions across the institution, and the remainder are set to adopt the system framework by 2020. Eleven divisions are currently part of the new framework, which includes Arts & Science, UTM, UTSC, Nursing, Music, Information, Social Work, Engineering, OISE, Pharmacy, and Dentistry. For participating divisions, course evaluations are administered centrally by CTSI through an online system. The Course Evaluation System addresses administrative, academic, and technical aspects of teaching with questions from the institutional, divisional, and departmental levels. Course instructors also have the option of choosing additional formative questions (or items as they are referred to in the Course Evaluation System) for each course they teach. These instructor-selected formative questions are private and only viewable by the instructor.
Toward the end of the term, an email from the centralized course evaluations team is sent out to course instructors. You will be given a period of time in which to choose additional formative questions. In Quercus the Course Evals tab (on the left menu) allows you to view past course evaluations. This tells you how other departments, divisions, and University of Toronto campuses fare on their evaluations. It should be noted, however, that individual course instructors (including yourself) can opt out of releasing their evaluations in publicly available data sets.
Ultimately, by asking students for feedback to improve our teaching we are fostering a culture of feedback. Creating a strong culture of feedback requires our engagement as teachers.
Listening to student feedback
After we ask for feedback, we need be ready to listen and do what we can to adjust our teaching in order for students to see the value of providing it. Remember that the reason we ask students for feedback is to improve our teaching practice. Therefore, both formative and summative feedback should be used to reflect on your teaching and to build your teaching dossier.
When reading through your feedback, consider all comments (about your teaching) and think through how you will work with this feedback to develop your teaching practice.
It will helpful if you talk to your students about feedback and give them chances to craft constructive feedback. You can tell your students that writing “This class was boring” is valid, but will not help you improve as a teacher. Instead, if students can frame their comments with what would have worked better or at least specifically what did not work for them, you can learn how to make the class better for future students.
Once you have the pile of paper or your summary of formal evaluations, what do you do with that material? You will also want to compare comments with your own self-assessment or observations from the term. Review CTSI’s Getting Formative Feedback with Mid-Course Evaluations which provides best practices around formative feedback, but that can be useful for summative feedback as well. Remember to document your feedback, keep all copies of evaluations (even the ones you think are bad), and make a plan for future change.
What about the feedback you are not sure how to use? After you have read through and processed your feedback, it may be useful to talk to someone at your institution. This might be a trusted peer or faculty member or someone at the University’s teaching and learning centre. At the University of Toronto we have the TATP for graduate-student course instructors and CTSI for faculty members. You can gain additional support at UTM through the Robert Gillespie Academic Skills Centre and at UTSC through the Centre for Teaching and Learning. All these centres will also have opportunities for professional development, such as workshops on revising your syllabus, creating lesson plans or assessments, or preparing your teaching dossier. Teaching is hard work, but there is help out there.
Reflect on your teaching
Reflective thinking is part of the critical thinking process that asks you to analyze and make judgments about what has happened. Gibb’s model of reflection clearly offers the reflective process.
- Description: What happened?
- Feelings: What were you thinking and feeling?
- Evaluation: What was good and bad about the experience?
- Analysis: What sense can you make of the situation?
- Conclusion: What else could you have done?
- If it arose again, what would you do?
We ought to thoughtfully reflect on our teaching in order to improve. Remember to target your refection on feedback toward a pedagogical purpose. For example, rather than focus on whether or not you made a mistake in the classroom, consider how potential mistakes affect students and how you modeled correcting that mistake. Ultimately, reflecting on our teaching should make us better teachers.
There are many ways to reflect on your teaching. For example, you could keep a teaching journal, ask for peer observations, record your class, and solicit student feedback. Writing in a teaching journal can be a very powerful exercise. It will be very easy to forget which activity flopped or was a success months after the class is over. Writing down your teaching experiences is a great way to capture your teaching experiences so that you can both reproduce great teaching moments and find ways to improve on teaching challenges. As you record your reflections, you will want to consider two types of reflection: reflection in action and reflection on action. Reflection in action is what you did in the moment to bring about or address a teaching success or challenge. For example, a form of reflection in action might be to redirect disruptive students during an in-class activity. Reflection on action is what you do afterward: for example, you might write about that teaching experience in your teaching journal as a form of reflection on action. It will be helpful to record both types of reflection.
After you record your reflections, think about what you might have done differently or what you want to keep the same. It will also be helpful to talk to colleagues about your teaching, especially in cases of severe teaching challenges. Talking through something is a great way to surface ideas that would not come up if we had just kept them in our heads. You might not even know what to do about a particular teaching situation, so asking trusted peers and faculty members what they would do is invaluable to solving your teaching issues. In addition, try reading some educational literature about a specific teaching challenge. A critical component of reflection is to create an action plan. Ask yourself:
- What will you do the next time this teaching issue arises?
- Is this teaching issue preventable? If yes, what could you do to prevent it? If no, what could you do to prepare for or mitigate its effects in future?
To practice reflection, you can use existing inventories to help you flesh out specific issues. Whether you are new to teaching or a seasoned educator, it can be quite illuminating to examine your beliefs around teaching. Try using the Teaching Perspectives Inventory (TPI). This questionnaire helps you to think about your teaching along five core perspectives: 1) transmission, 2) apprenticeship, 3) developmental, 4) nurturing, and 5) social reform. In this video, Daniel D. Pratt discusses how to interpret your TPI results and use them as a way to start a conversation about teaching. He also recommends that you take this questionnaire every so often because as we change and grow as teachers, our beliefs about teaching are altered as well. The TPI does not test you for specific perspectives that you should have but rather, through a series of questions, reveals to you in which teaching perspectives your priorities lie and gives you some data to think about your personal teaching practice. This is a useful exercise because in order to figure out the direction of your teaching path, you first need to figure out where you are.
Supports for Students
As teachers, we should be ready to support our students as much as we can, so it is a good idea to familiarize yourself with the student resources available on campus.
How can you share support resources with your students?
Post links to resources on your course Quercus page, put them in your syllabus, and share a slide of resources with your students in lecture for the first couple of classes. Fostering Safe. Equitable, and Accessible Learning Environments offers suggestions on what one can do during situations.
Why do we want students to know about academic and community supports? It is important that we convey to our students that academic and community supports are not only for struggling students. Sharing this idea with students will help to you normalize the process of students seeking help. Ideally, we would like to encourage students to use these services as much as possible because all students can benefit from a reminder about good study skills or how to locate the Housing Office if they need a place to live.
How do you learn more about student support resources? CTSI’s U of T Resource for Instructors provides information on offices on all three campuses.
Referring students in distress
Something that might come up in the classroom environment or through in-person contact during office hours are disclosures of distress from students. The following suggestions are one way to support students in distress. If you already have a protocol that works for you, stick with that. But if you are uncertain what to do in cases of student distress, try the following approach of observe, engage, and refer.
Given that mental health and well-being of students is a shared responsibility of all campus community members, it is important that you become aware of how to identify warning signs, how to assist students who are in distress, and how to effectively refer them to various University of Toronto services and resources. There are people and services on campus to assist you in dealing with distressed students. Common reasons for consulting include determining the seriousness of a situation and how quickly it needs to be addressed.
Observing and recognizing when a student is in distress may be relatively straightforward when the signs are obvious. But when the signs are more subtle, it is more difficult, and you may feel reluctant to intervene. In such cases, you can look for a number of indicators in a student’s thoughts, feelings, actions, and academics.
Regardless of our individual roles on campus, any one of us may have the opportunity to help prevent a student from finding themselves in crisis. As a TA, you may be in a unique position to help a student in distress. The question “Are you OK?” can be a simple and powerful way to start a conversation with a distressed student. Although you cannot reasonably be expected to solve the student’s problems, simply asking the student if you can help or if you can connect them to someone that they know can be very beneficial.
There may be any number of circumstances in which it would be appropriate for you to refer a student for help. In such cases, help the student to explore sources of possible support. If you have any printed resources, offer those to the students to take away and have on hand for later. You can also offer to contact a resource, using the guide listed above, while the student is still in your office or to walk to the resource office with them.
It is important that you are able to recognize when the situation needs more immediate attention than referring a student. If a student is expressing signs of distress, without posing a risk to self or others, a referral is a good course of action. If the issue seems more urgent, for example the student needs help but there does not seem to be imminent danger, you should contact the Crisis Response Team at 416-946-7111. Some signs of urgent distress may include: passive talk about harm to self or suicide (without a plan in place), expression of hopelessness, significant disturbances in thinking, or aggressive or impulsive behaviour. You may also be faced with emergency situations of student distress. Some signs of emergency distress include: talking about a plan to harm self or others, disruptive behaviour that seems out of control, or a situation that feels threatening or dangerous.
After a few days, follow up with the student to see how they are doing. This does not need to be an invasive set of questions, but can be something as simple as “It was great to see you back in class today. How have things been going since we last chatted?” Remember, however, that as a teacher, you are not trained, obliged, or allowed to act in the capacity of a counsellor, so know your own personal boundaries and talk to the disclosing student about their preferred boundaries as well if possible. If you are unsure about what the boundaries are, you are not alone. Knowing how much or how little to say to a student or disclose about your own similar experiences can be tricky.
How to Support English-Language Learners, Multi-Language Learners, and International Students
The University of Toronto has many international students, many of whom are studying and living predominantly in English for the first time. As a course instructor in this highly-multicultural environment, you will likely encounter a range of language-competency-levels in your students. Below we will discuss strategies for supporting occasionally overlapping student populations: English-language learners (ELL), multi-language learners (MLL), and international students. ELL are those who are learning to operate in English proficiently enough to earn their university degree. MLL are students who regularly engage in more than one language; some of these students may not have completed all or most of their formative education in English. International students are new to the Canadian and Ontarian education system, which may be very different from their previous education system from their previous education system…which may or may not have been in English.
An important caveat: We are not suggesting that you adopt different standards of evaluation of course work for ELL and MLL or international students than for students that you assume are native speakers of English. We do want you to think about how to engage all learners and to best understand barriers they may encounter to learning. While these three groups (ELL, MLL, and international students) each have their own needs, there are some common strategies that will support them all in the classroom.
Leveraging strengths rather than emphasizing deficits can be very powerful. If we focus on the course material and the competencies that students are expected to be developing in the course, rather than focusing primarily or exclusively on students’ ability to communicate in English, we can increase a sense of belonging and motivation to learn. For example, consider: What is the competency that students are being evaluated on? What are other competencies that might actually be getting in the way for certain students—and possibly many students—when proving their mastery of that competency? Essentially, we recommend applying the principles of UID to all aspects of course design in order to allow students to use their strengths in order to learn how to succeed in your course.
The relationship of formal communication in English to course competencies will vary between disciplines; there are some fields and levels of study where students who struggle in English will have difficulty with the material itself and have difficulty proving their competency in course material. In a class where the major evaluation is formal essays or other kinds of formal writing, consider scaffolding these assignments so that students have an opportunity to get feedback at several stages, and have an opportunity to correct grammar and style problems (see section 4.2 above on scaffolding). Focusing on whether or not the grader can understand the ideas being conveyed in student assignments will help motivate students to improve and to see the value in communicating well. If you need to show that the high number of errors is distracting and disruptive to clarity, highlight a single paragraph where you mark out all errors rather than every single one across the assignment. Additionally, encourage all students to use academic support resources, such as Writing Centres, throughout the term and emphasize that these are valuable resources for everyone, rather than sources of remedial help.
For example, provide lecture outlines to show how they are organized and explain their purpose. It is also a good idea to present information in both oral and written forms wherever possible. For instance, write key words on the board while you are speaking or construct PowerPoint slides that highlight what you are saying while you are speaking it. During class discussions, rephrase or summarize student responses occasionally so that students who may not have heard or understood have an opportunity to understand important points in class discussion. It is also a good idea to use writing as a way of exploring material and have some ungraded writing in the class. This will give all students multiple opportunities to engage with course material in ways that are not necessarily dependent on perfect command of academic English.
Provide students an opportunity to carefully construct their questions in writing rather than speaking them on-the-spot. Some ELL and MLL students might need some time to think of ways to articulate a question that they have about course material. Other students who are struggling with the language might simply feel shy speaking up in class and will not ask a question even if they have a clear idea of what they would ask. Alternatives to in-class questions could include: using the discussion-board feature in Quercus (see section 5.6), asking for informal reflection papers throughout the term, or asking students to come with prepared questions at the beginning of class. This will certainly be a benefit to ELL, MLL, and international students, but it will also be a benefit to many other students as well.