What is a rubric?
A rubric is an explicit set of criteria used to assess and communicate expectations of student performance on assessments. It typically indicates levels of achievement in different categories. Rubrics can be used for many formats of student work, including written assignments, oral presentations, class participation, and many others.
Why use a rubric?
Rubrics are important tools for evaluating student work. Using a rubric can provide several advantages, including:
- Efficiency: Using a rubric can cut down on grading time by providing a streamlined grading process with predefined criteria.
- Clarity: A rubric reduces ambiguity in evaluation by communicating assignment expectations clearly and in advance.
- Consistency: A rubric promotes consistency between TAs by providing a grading framework that all TAs are expected to use.
General recipe for a rubric
(adapted from the University of Waterloo)
- Assessment criteria: A list of components (skills or demonstrated knowledge) required for a successful assignment. Each criterion can be weighted differently relative to its importance in the overall assignment.
- Achievement/Grade scale: Within each criterion is a scale to assess student performance. This scale can be numerical or distinct categories that represent degrees of achievement.
- Written descriptions: Within each criterion, each achievement level is described in enough detail such that students can follow and understand what work needs to be done.
- Space for feedback: An effective rubric provides the TA with space for written feedback. In addition to filling in the rubric criteria, summative or marginal notes explain why the student received their grade.
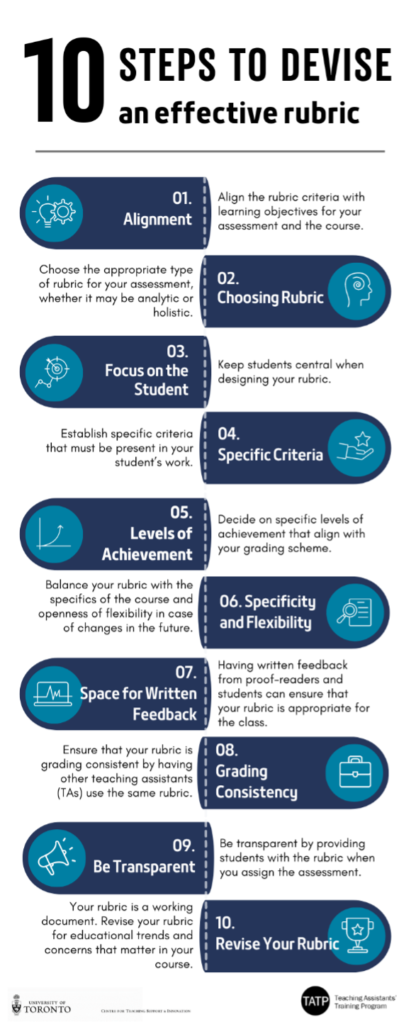
10 Tips for Effective Rubric Design
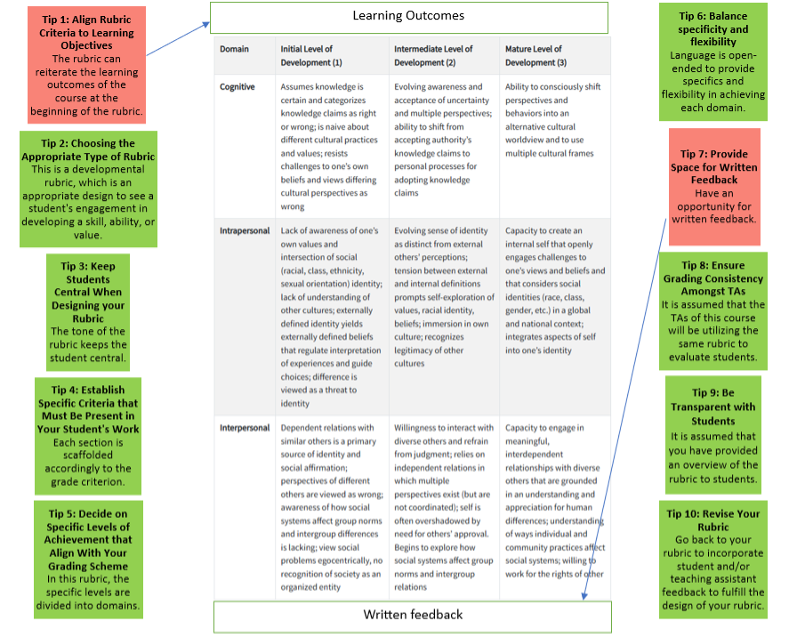
Tip #1: Align rubric criteria with learning objectives.
Before designing your rubric, ensure that it aligns with the learning objectives for:
- The assessment: Ensure that the rubric aligns with key skills and knowledge that students are expected to demonstrate in this assessment.
- The course: Use the rubric to reflect how the assessment aligns with the learning goals of the course.
Tip #2: Choose the appropriate type of rubric
There are several different types of rubrics, such as Analytic, Holistic, and Developmental rubrics. Most commonly, postsecondary evaluations use Analytic rubrics. Analytic rubrics typically break an assessment into several criteria to be assessed separately using levels of performance. These rubrics can be presented as a matrix with a scale of achievement levels along one axis, and distinct criteria along the other axis, with unambiguous descriptors that communicate expectations to students at every level.
See examples of different types of rubrics below.
Tip #3: Keep students central
Consider your students at every step of rubric design. Rubrics are important for promoting transparency in the grading process, guiding students through the assignment completion, and allowing students to assess their own work. Consider the diversity of learning styles in your classroom and check that your rubric supports the needs of all your students. This will promote an inclusive, equitable, and positive learning environment.
Tip #4: Establish specific criteria
Define the requirements for the assignment by identifying key skills or knowledge that you want your students to demonstrate and making them criteria for the assessment. This could include skills like critical thinking, creativity, clarity, and organization, among others.
Next, assign weights to each criterion based on its importance relative to the goals of the assignment. For example, you may want to emphasize the importance of demonstrating critical thinking by placing more weight on that criterion than on clarity or organization.
Tip #5: Decide on specific levels of achievement
After defining your criteria, determine the specific grade or achievement levels for each criterion. Determine what is “exceptional”, “satisfactory” or “unsatisfactory” for each criterion and use specific language to articulate this clearly.
Consider how many levels you will use, the grade range of each level, and how they relate to institutional GPA measurements. You can choose to use achievement levels (ex. Exceptional, Satisfactory, Unsatisfactory), or grades (ex. A, B, C, D or 90-100, 80-90, 70-80, etc).
Tip #6: Balance Specificity and Flexibility
When creating your rubrics, consider the balance of specificity and flexibility of your document. By being specific in the content and being flexible to potential changes, you will create a rubric that is clear and adaptable to students.
Specificity
A specific rubric has the qualities of being clear and exact (Cambridge Dictionary, 2024). Rubrics can be discipline-specific, meaning that you will be designing rubrics based on the department and expectations of the university. Check with your associated faculty to ensure that your rubric lines up with their values and assessment strategies.
According to Brown University (2024), there are several ways to be specific in rubric design.
- Being sensitive to the language used.
Consider the tone that you are using to write your rubric. While rubrics are means to convey information about the content and assessments of your student’s work, do not assume that your writing can portray a negative tone or showcase a critique that is overly pointed to the learner. By utilizing an active voice from Bloom’s Revised Taxonomy and avoiding subjective or unclear language, this will allow you to be sensitive to the learners when designing your rubrics. - Define clear and measurable objectives.
As mentioned in Tips 4 and 5, it is important to define clear and measurable learning outcomes and objectives to establish criteria, quality levels and scoring strategies. By offering specific instructions and clarity in these areas, your rubric will reflect the content of your course and offer clarity to learners. For instance, if many students received a poor grade on a specific criterion of your rubric, this would tell you that your language may be too subjective or confusing for students. If a specific criterion is difficult to grade, they may indicate that it is too broad.
Flexibility
Flexibility in effective rubric design means that you are open to making changes according to feedback from students or colleagues or from your own observations. It is essential that you test and evaluate your rubric before and after your class for purposes in grading and integrating feedback to/from students. Some strategies that you can use to ensure flexibility include:
- Utilizing previous student works to test a rubric prior to providing your version to students in the next cohort.
- After using your rubric in the class, review student assessments to see how students met the criteria.
- Consider the advice from TAs to see if they were able to navigate the rubric seamlessly during the grading process of each assignment.
- Adjust the scoring categories to reflect a holistic judgement of all the grading criteria as an overall combination. If a student is unable to complete the assignment with the given criteria, provide alternatives to complete the same assignment with different criteria and revise your rubric to reflect these options in future teachings of the course.
Tip #7: Provide Space for Written Feedback
Often appearing at the end of rubrics is a section for written feedback where students can receive comments from their TA or course instructor. This is particularly important for assignments that require critical analysis and writing. In this area, you can communicate a comprehensive overview of the student’s assignment by assessing the learning goals present in the student’s work. You can also explain the next steps to improve on their work based on your observations. In this section, you can utilize the “feedback sandwich” to scaffold your written feedback:
- Step 1: Praise. Start with positive feedback by emphasizing what the student did well in their work.
- Step 2: Ways of improvement and course of action. Outline ways the student can improve on their work or a course of action that the student can take to improve their performance on future assignments.
- Steps 3: Praise. End your feedback on a good note by reiterating what the student did well.
Tip #8: Ensure grading consistency by having teaching assistants use the same rubric.
In cases where you are designing a rubric that will be used by multiple TAs, keep this in mind and outline the expectations for grading and feedback deadlines. Here are some ways to ensure that there is grading consistency amongst TAs that use your rubric:
- Prior to the start of class, gather the TAs to meet and get to know each other as a group. This will establish rapport and open lines of communication about grading.
- Delegate tasks to your TAs according to the Description of Duties and Allocation of Hours (DDAH) to fit accordingly to their semester schedule.
- Have an open-door policy. Reiterate to your TAs that you are open to any questions or concerns at any stage of the grading process and open to suggestions for changes to the rubrics for the current or future cohorts of the course.
Tip #9: Be transparent by providing students with the rubric when you assign the assessment.
Being transparent with your students about your expectations is important to ensure that your rubric is a fair assessment tool. Here are some ways to ensure that your students are familiar with the assessment expectations outlined in your rubric:
- Go through the assignment in class with your students. This ensures that you explain the instructions, expectations, and the rubric. This is an opportunity for students to ask questions about the rubric.
- Establish office hours where TAs and/or the course instructor are available to answer student queries.
- Make the rubric available in various formats. This can include sharing an online copy and providing a print-out during class.
Tip #10: Revise your rubric.
The rubric is a working document that you can revise accordingly. Now that you have completed the 10 Tips to design your rubric, you can revisit them to update your rubric according to current trends in your field or new educational design ideas. Some things to consider in the revisions can include updating criteria that students had trouble with or increasing flexibility in assignment submissions (for example, consider providing a variety of modes like video submissions, essays, etc.).
Different Types of Rubrics
There are many different types of rubrics that you can use for your course. You can visit the Course Design section of the TATP website to access sample rubrics to support the planning of your rubric.
In this tip sheet, we will showcase two examples of rubrics and indicate how the tips outlined above are associated with their design. Please see Example 1: Analytic Rubric – Essay Grading and Example 2: Developmental Rubric – Intercultural Maturity to understand the differences between analytic and developmental rubrics and whether these rubric examples have accomplished the tips.
Example 1: Analytic Rubric - Essay Grading

Example 2: Developmental Rubric – Intercultural Maturity
Key Takeaways Infographics
You can save the following infographics to have quick access to the recipe for a rubric and the 10 steps to devise an effective rubric.
Additional Resources
Here are some additional resources for further reading to support your rubric design.
How to Design Your Rubric
- Planning and Delivering Your Courses Archives – Centre for Teaching Support & Innovation
- Course Design – Centre for Teaching Support & Innovation
- Effective Instructional Techniques (Writing Centre)
- Teaching with Quercus Los and Rubrics (PDF)
- Responding to Student Writing Effectively and Efficiently (Writing Centre)
- Designing Assignments and Presenting Them to Students (Writing Centre)
- Grading with Rubrics – Centre for Teaching and Learning – Western University (uwo.ca)
- Rubric Best Practices, Examples, and Templates – Teaching Resources (ncsu.edu)
- Rubrics: Useful Assessment Tool (University of Waterloo)
- TA Time Management – Planning Your Tutorial (TATP)
Further Reading
- The Trouble with Rubrics (#) – Alfie Kohn
- Make Your Rubric More than a Wall of Words (ascd.org)
- Wiggins, G. (1998). Educative Assessment. Designing Assessments To Inform and Improve Student Performance. San Francisco: Jossey-Bass Publishers.
- Secolsky, C. & Denison D.B. (2018). Handbook on Measurement, Assessment, and Evaluation in Higher Education. Florence: Routledge, Taylor & Francis Group.